Colour Correction For Scuba Dive Photos & Videos
When most of us come back from dive trips, we marvel at the photos and videos of our underwater adventures. We want to show everybody what we saw in the oceans, especially to our non-diver friends and family.
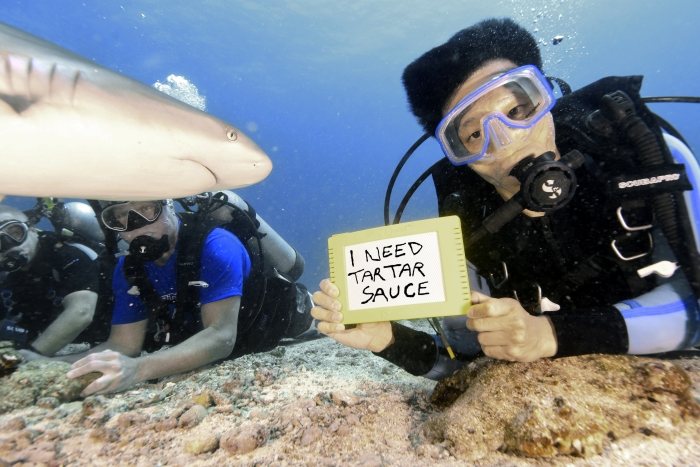
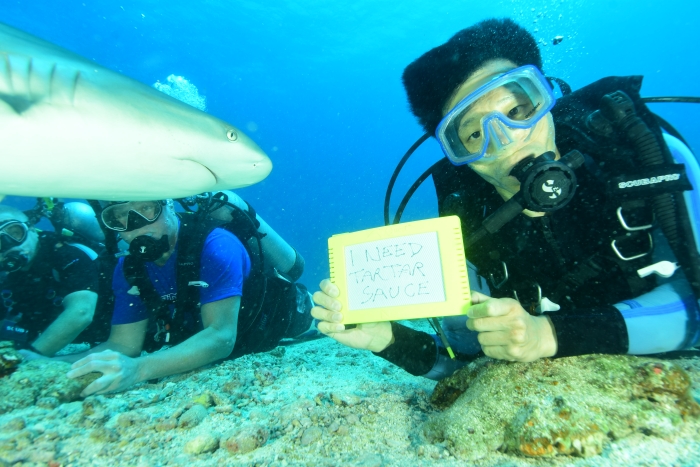
This is exactly what I did since I have proof that I was in the same type of environments that Blue Planet or National Geographic specials showed. Below is a photo from a shark dive I did in Saint Maarten which I was so proud of showing to others when I got back to Canada.
But hold on a minute — is the sandy bottom suppose to be blue? Is the shark or even the skin of my face and hands suppose to be bluish? Of course not. So what happened?
Turns out the underwater, colours mess up a bit so that by the time images are captured on cameras, everything becomes blue washed. This is usually the case with most underwater photos and videos taken in salt water. For photos and videos taken up here in Ontario with fresh water, we get green washed much of the time.
So the underwater footage we took, no matter how exciting and interesting they might seem, are not accurate representations of what we actually saw during our dives. Thankfully, there’s something we can do about this — colour correction.
Usually most underwater photos and videos can benefit with some colour correction. The only time when you can get away without using any colour correction is when shooting subjects really close up and with a strong light, ie., macro photography. Otherwise if you just use your eyes and judge whether certain objects in your photos and videos did not come out with their true colours, then colour correction can be applied.
Some Colour Correction Resources
If you have Photoshop installed in your computer, there are some easy adjustments you can make to colour correct your underwater photos. Instead of writing out all the different steps, I’m going to refer you to one of the best resources I used to help me colour correct my dive photos.
See this article called 5 Minute Edit For Underwater Photographers. I did some but not all of the steps outlined here in this article to get results shown in the lead photo above. Now you see the sandy bottom with its proper colour and the dolphin and my face with its natural colours too. Pro dive photographers can do much more complex techniques but I just did a few of the main simple steps from the article to get such amazing results as shown in the photo. These were good enough for me to get enlargements made for my walls.
For underwater video, similar steps can also be taken to colour correct the entire footage. One of the best online resources I found is at the embedded video below since they show steps for both salt and fresh water.
I’ve used the steps in the above video to colour correct most of my past underwater videos, even the footage taken by dive operators (dolphin and shark dives) since what they sell me are actually not colour corrected.
Both resources above are good for Photoshop and there are many similar resources online for other photo and video editing programs, many which are newer or free to get online. For example, I had Photoshop installed in my old Macbook but not on my new Macbook. So I found similar colour correction steps for a free video editing program I used called Shotcut for my new Macbook and this is what I used for the video footage from our recent Vancouver Island BC dive trip.
If you do not have Photoshop, there’s a good chance that there will be a resource on colour correction for whichever photo or video editing program you have on your computer. Just search for them but at least the two I provided here for Photoshop will give you a good primer on colour correction.
These days whenever I see underwater photos and video which are not colour corrected, I kind of pass them over pretty quickly because now that I know that basic colour correction is available and easy to do, I would rather see only colour corrected photos or video.
Now if you are still undecided about whether it’s worth the effort to colour correct your dive photos or not, just compare the two shots above since they are the same photo. You can see just how much better the colour corrected version is compared to the raw image.
